Easy DIY Wedding Ideas from our Facebook Page
If you follow us on Facebook, you’ll know that we share a lot of wedding and event decor inspiration for our many students and fans. You’ll also know that we’re DIY-enthusiasts and love to share unique ideas for the next wedding or event you plan. And if you’re not following us on Facebook, you’ve made a huge mistake and should probably go do that right now.
Today we’re throwing it back to some fun and relatively simple DIY wedding decor and accessories that we’ve shared with you on Facebook and will give you an idea on how, exactly, to make them! So gather up some friends, or even the bridal party, to start making these fabulous decorations and accessories your guests will love!
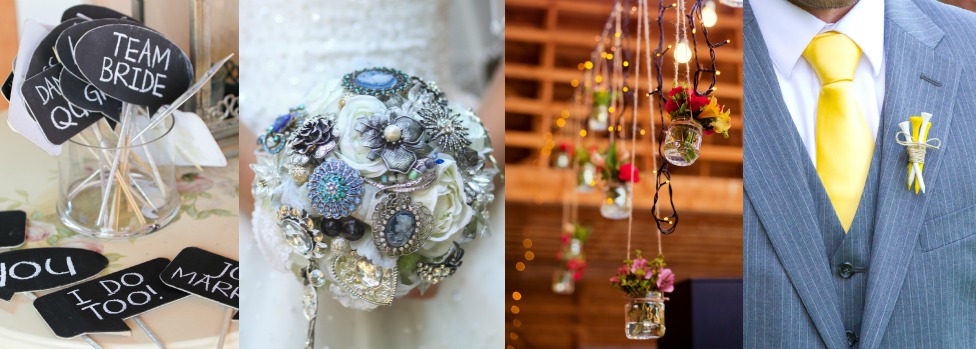
Chalkboard Speech Bubbles for a Photobooth

Many brides and grooms are opting for a fun photobooth at their reception to help keep their guests entertained all night. It’s a great way for family and friends to bond as they make silly faces for the camera and eternalize the fabulous time they had. These speech bubbles pair great with costume items like feather boas, oversized sunglasses, and goofy hats. To make these trendy signs, you’ll need some cardboard, chalkboard paint, a paint roller, chalk, a pair of scissors, glue, and something to attach it to, like a wood stick, a straw, etc. Or, you could even skip the stick all together and have guests simply hold the signs—whatever is your preference!
First you’ll want to paint the cardboard and allow a sufficient amount of time for the chalkboard paint to dry. You may need to do multiple coats. Once completely dried, cut the cardboard to your desired size and shape. If you’re not great with scissors and simply eyeballing your speech bubble design, consider printing one from online and scale it to the same size you want your speech bubbles. Use that as your guide when cutting the cardboard. Next, write the text on the sign. You should consider doing this before gluing on the handle so that you can work on a flat surface and ensure your writing is neat. Allow a few minutes for the chalk to set. And finally, glue your handle to the back of the board. Since you’ll be turning your sign over on the front, consider placing it on a smooth, clean surface and not a fabric surface that could easily smudge the chalk. Give the glue a chance to dry completely before picking up your sign. And voilà! You’ve got a trendy new sign for a wedding photobooth! If you’re making more than one sign (and you probably will be), complete each step in bulk rather than making each sign one at a time.
Brooch Bridal Bouquet

Brooch bridal bouquets have consistently been a reccuring trend for the past few years. We even polled our Facebook audience to see what you guys think of them, and majority ruled that this trend is still going strong.
The idea is that they’re stylish, will last forever, it’s cheaper than real flowers, and can be sentimental if the brooches have a special significance for the bride. And not to mention extremely fun to make! You’ll need a lot of brooches, faux fabric flowers, spools of wire, fabric tape, a ruler, pliers, a power drill, and silk or lace fabric.If you’re making them for the entire bridal party, you’ll want to get their help as well! We posted our own tutorial for a DIY brooch bridal bouquet last year. Check it out!
Stringed Mason Jars and Twinkle Lights

This DIY decor makes my job (and yours) so easy because it is extremely simple! The most difficult part of this project will be the set up on the day of the wedding. This decor is right on trend with summer barn weddings that are still very popular among brides and grooms.
The ingredients for this project are few. You’ll need some twine (which, if you’re a DIY-fanatic like me, you probably already have), some small mason jars, twinkle lights, and of course, scissors. First you’ll want to securely and tightly wrap twine around the mason jars. You could even use some glue for added protection, but make sure you leave a little wiggle room in order to attach more twine. Next, tie the two ends of a long piece of twine to the other twine you’ve wrapped around the jar. This will allow you to hang the jar for your decoration. You may want to consider using varying lengths so they hang at different heights for even more visual appeal. Do this with as many jars you need to fill the space where you’re hanging this decor. Pretty easy, right?
Next, you’ll need to decide what you’re going to hang these jars and twinkle lights from. You will need something strong and secure. For example, you could use rope—either bought or made by you. To make your own rope, twist or braid multiple pieces of twine together. Ensure that your rope is strong enough to support the weight of the lights, the mason jars, and the water and flowers that will be put into the jars. And finally, hang the rope and space out your jars and twinkle lights as you see fit. This will be a two-or-more-person job as you may need a ladder (depending on where and how high you’re displaying this decor), so don’t try to tackle this set up all on your own. The final touch will be adding the flowers and water to the jars on the day of the wedding.
Golf Tee Boutonnière

And finally, something for the groom! This boutonnière is perfect for a golf-loving groom and can easily match the wedding’s color-scheme as there are so many different color golf tees available! It’s also a great alternative for those who are trying to save a few bucks on their flower budget.
For the neatest finish, I would suggest using thin hemp twine. In this particular boutonnière, five golf tees were used but you can decide how many you want to include. Gather the tees and decide how you want them placed together (on what angles, at different heights, etc.). Then take your hemp twine and tightly wrap it around your cluster of golf tees. The tees may shift as you wrap them together, but if you make it tight enough you’ll be able to adjust their positions afterwards. Once you’re happy with the amount of hemp twine you’ve used, secure it with a couple of tight knots and finish it off in a bow, cutting off any excess string. You can easily attach the boutonnière to the lapel with a sewing pin or safety pin.
And there you have it! Four amazing and relatively simple DIY projects you can use for the next wedding you plan or to suggest to friends. Happy crafting, and let us know how your projects turn out!

